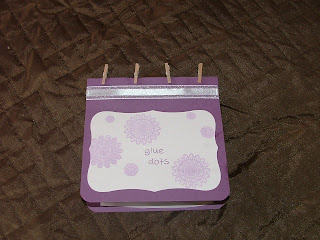
I love glue dots. Luckily I happened upon a tutorial last year and I have never purchased another glue dot since. When I went to Scrapfest last month, my good friend came and showed me a small holder she had made for her glue dots, since we needed to bring some for our classes.
I, of course, wanted one of my very own.
Now, to make glue dots you need 2 things:
1) parchment paper (NOT wax paper)
2) Aileen's Tack it over and over glue (it's this stuff)
What I do is cut my parchment to the width I want and then fold in half. Laying it open, I dab on the Aileen's in whatever size I like. You can easily make them thicker by not spreading out the glue as much with the tip of the bottle... it's up to you how flat or dimensional you want them. (See? SO MUCH better than buying them.) I tend to make a lot of little ones, a few medium, and then a couple of larger ones. Now set them aside - someplace safe, where kids or pets or errant husbands won't pick them up and wonder why they are suddenly covered in glue - and let them dry. This will take hours or a day or so depending on how large you made them. You will know they are dry when they turn from white to clear, and then you can fold the parchment over so that the sticky part is covered up!
My glue dot holder is 6x6. I cut a front and a back, and then used my largest Nesties labels 8 to make the cover (Maya Road doilies, Lawn Fawn alphas). Then I slid my folded parchment papers inside and glued it shut, clothes-pinning it until it dried. I have the mini clothespins still on there just because I think it looks cute. So there.
See? Inside is just glue dot goodness:
Yes, I know my parchments sheets aren't all the same size. It doesn't keep me up at night. :)
Thanks for looking! Go make some glue dots. :)
Jen


Okay....seriously.... a holder for your glue dots... I MUST meet this friend of yours :) hehe! Love it! I am going to purchase a new bottle one of these days and try this again... I shall conquer the glue dot!!!
ReplyDeleteWow thanks so much for sharing this. I will keep this in mind. Hugs AJ-
ReplyDeleteWell, aren't you just too clever!!! Love this! I use that glue all the time on unmounted stamps, but never thought to use it for glue dots! Thanks for the share! You asked me about the glitter dust - yes, it must be sealed with glossy accents :( Thanks for your nice comment!
ReplyDeleteVery cute idea to make a little book of glue dots.
ReplyDeleteThx for sharing this tutorial and your clever storage technique...always figured there had to be some product that could be used to do this. As soon as my dots are used up, I'll be opening my glue dot 'factory'!
ReplyDeleteOh, THANK YOU., Jen,--this is great. I think I'll go your route now.
ReplyDeleteMostly, when I need dimension to my projects, I just use my hot glue gun [on the low setting] to make 'dots' on the back of my project then let it dry several seconds and place it gently where I want it on my project. But I think your method is much better. I, like you, live in 'the country' and rarely get to 'town', but next trip the glue is on my list for Michaels.
thanks again,
Diane
http://DianesDigitalDesigns.blogspot.com